
How to Sharpen a Reed Knife
Are you looking for some tips to up your knife-sharpening game? You’ve come to the right place! Oboist Anna Betuzzi will walk you through the steps to hone and maintain an optimal scraping edge on your reed knife.
After all, sharp knives make good reeds!
As always, when working with tools, please use caution. Be sure to sharpen knives in a controlled environment, and make sure your sharpening stone is secured to your working surface before sharpening to prevent slips.
Different Types of Knives
Before we get started, it’s important to determine the type of knife you will use. Depending on the shape of your knife, it may need to be sharpened slightly differently (bevel in particular). Different knives may work better for different stages of the reedmaking process, and the knife type you choose also depends on your personal preference!
Here’s a diagram demonstrating some common knife types:
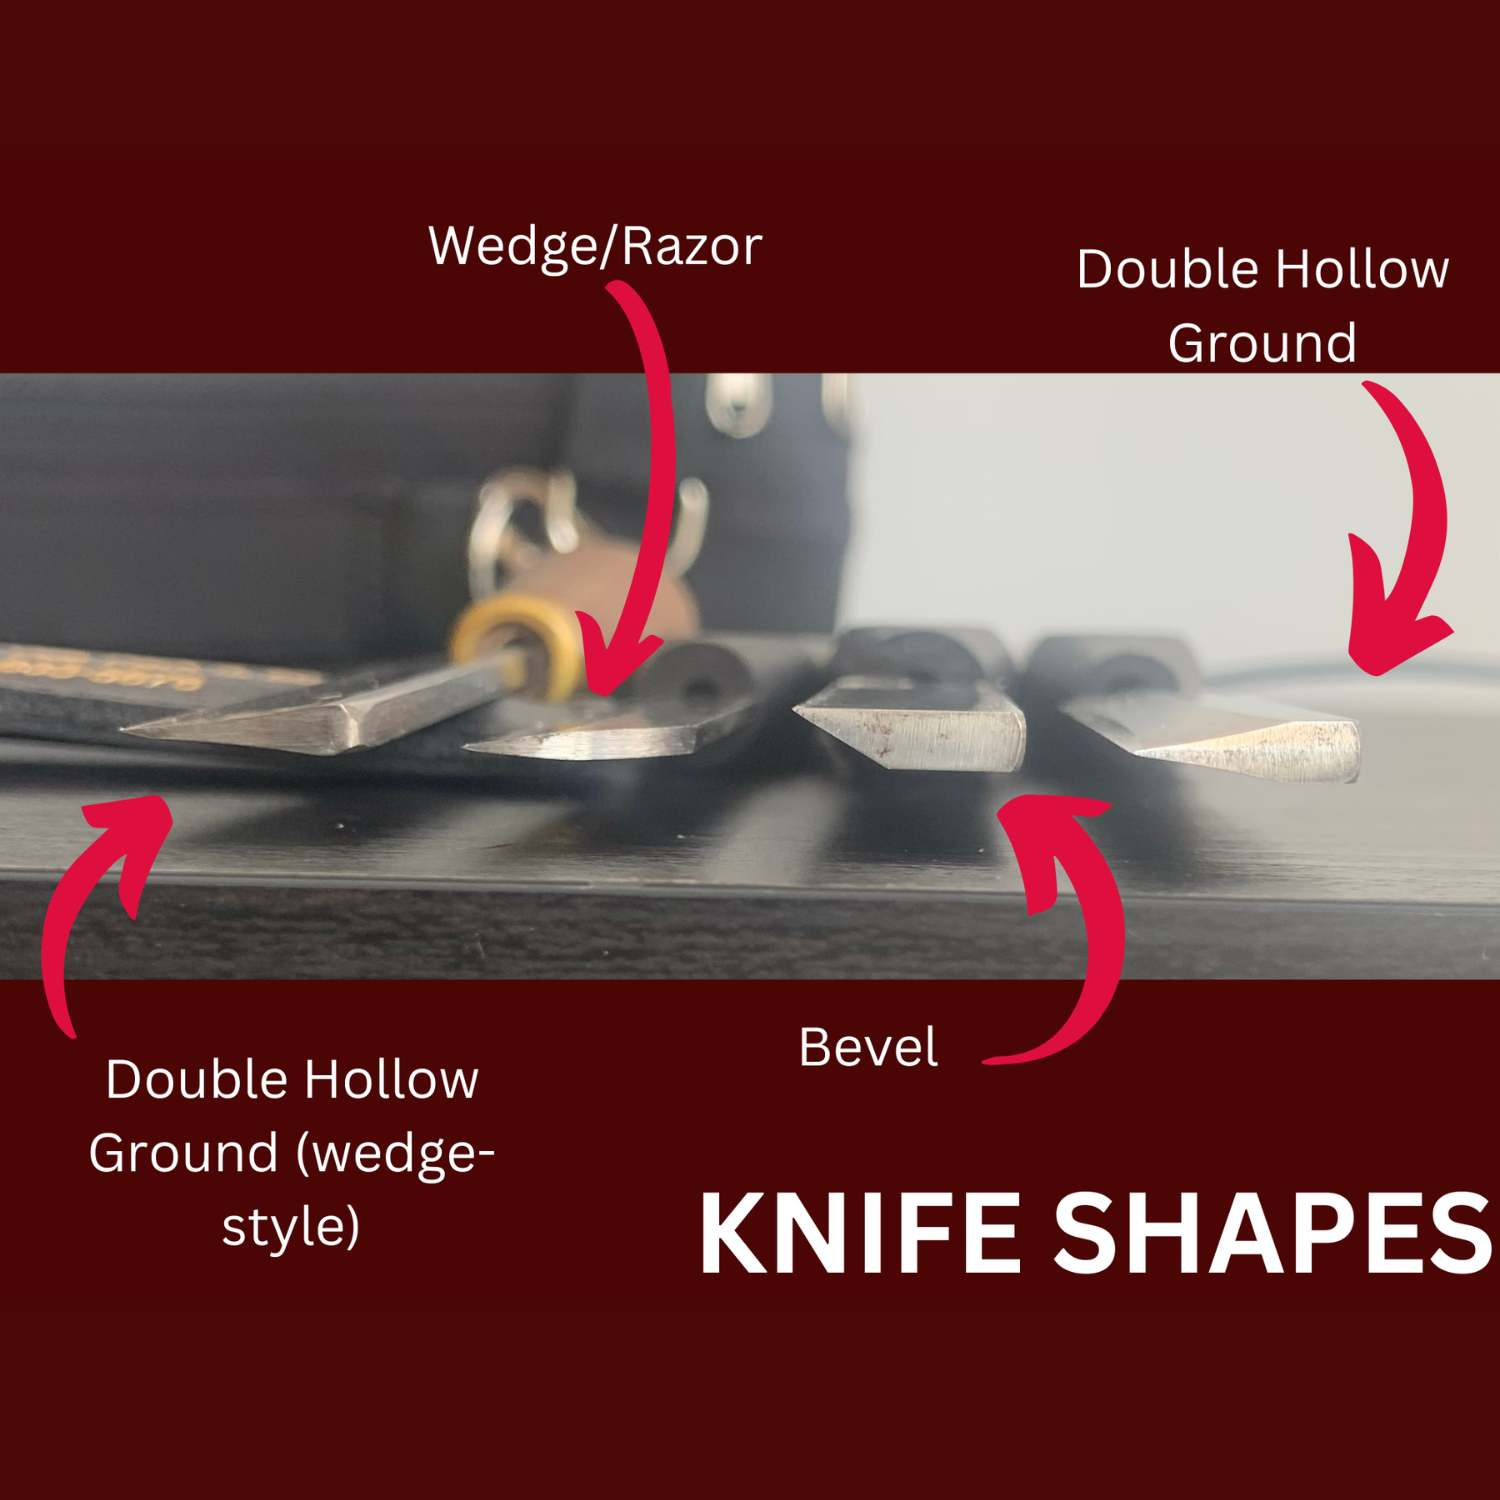
In my experience, bevel knives work best for the initial phases of scraping a reed. They tend to stay sharp for a long time because the angle of the bevel is steeper. However, the thickness of the knife overall makes it harder to see the reed underneath it, which makes it less ideal for the detailed scraping required in the finishing stages.
On the other hand, I prefer double hollow ground knives and wedge knives for the finishing stages of the reed, and especially for working on the tip of the reed. The narrower design of the knife allows you to see exactly where you are scraping, which gives you more control. However, they will need to be sharpened more frequently, as the edge of the knife is narrower overall.
Left-handed vs. Right-handed Knives
While some knife types can be sharpened to suit both left-handed and right-handed reed makers, other knife types require you to select the correct ‘handedness’ when purchasing. Basically, if the shape of the knife is symmetrical, such as double hollow ground and razor knives, it can be used left-handed or right-handed. Whereas asymmetrical knives, including beveled, must be manufactured with right or left-handed use in mind.
It’s important to note that some types of double hollow ground knives, including Landwells (the double hollow ground wedge-style knife in the photo above), have a small asymmetrical beveled surface near the edge. This means you must purchase the correct handedness for these knives.
The Theory Behind a Sharp Reed Knife
A sharp reed knife is a very different thing from a sharp kitchen knife. Most kitchen knives are intended for use in a cutting motion, meaning the edge of the knife needs to be smooth and perfectly symmetrical.
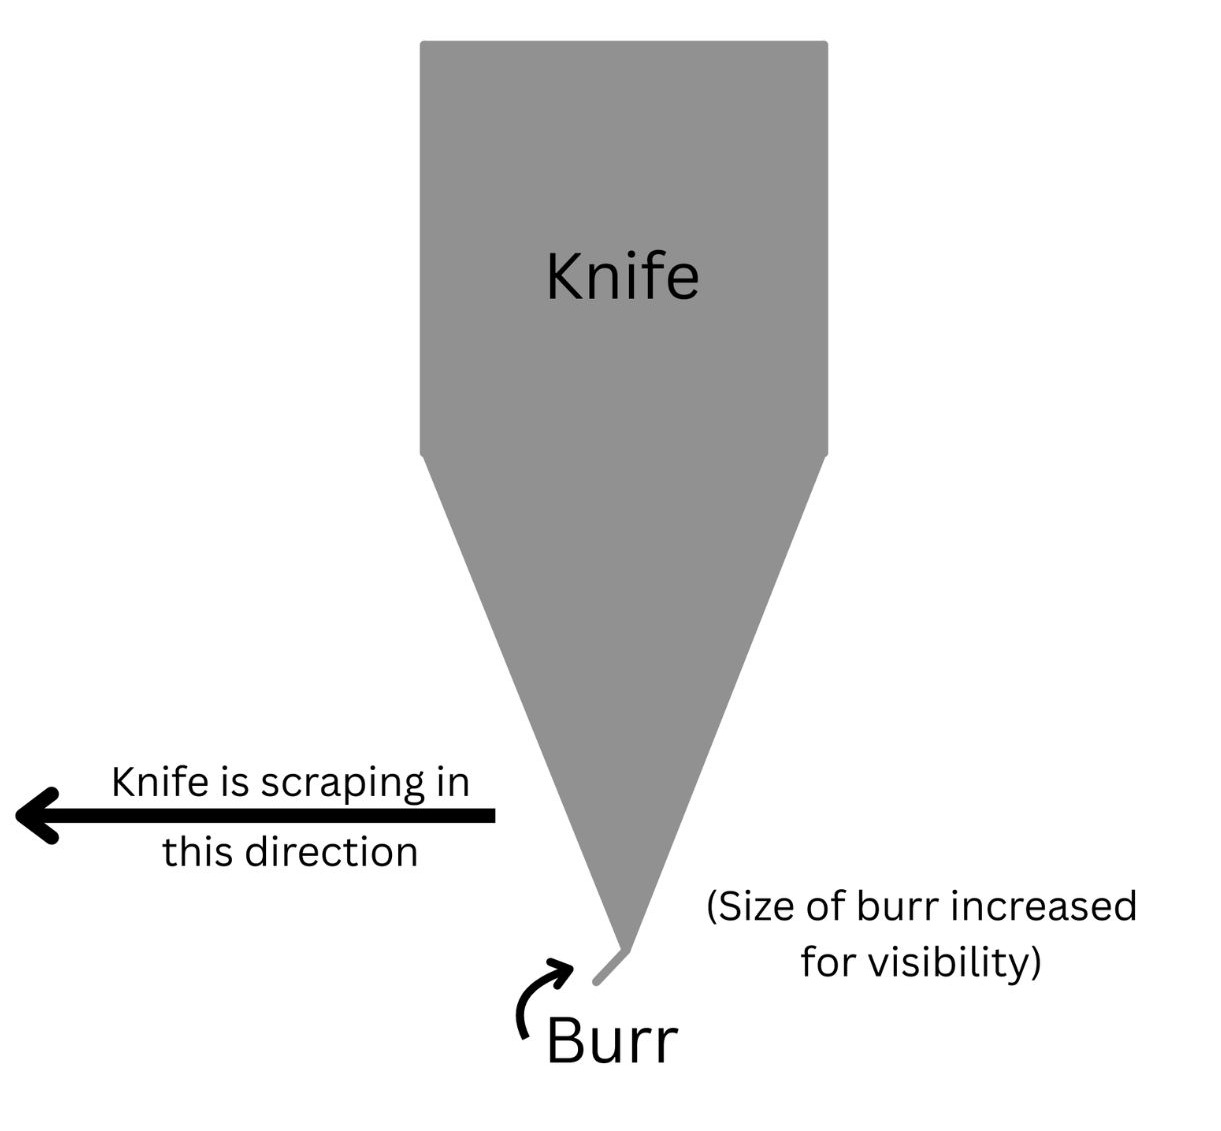
Reed knives are different. They remove cane from the reed by scraping rather than cutting. To achieve the scraping action, the very edge of the knife is slightly bent in the direction that you are scraping in. This bend on the edge of the knife is called a burr. Essentially, the burr ‘scoops’ the cane off the reed.
Here’s a diagram demonstrating how a burr works:
In order to create a great burr, it is necessary to create a smooth, straight cutting surface first. This initial step involves running both sides of your knife over the sharpening stone to remove the old, damaged burr, as well as ensuring the angles on both sides of the knife are restored. After both edges of the knife have been honed and smoothed, the burr can be created.
Avoid Rounding Your Knife!
The angles of your knife have been precisely engineered for optimal reed-making. To preserve these angles, always sharpen your knife with the lowest possible angle (while still removing the necessary amount of metal). In other words, the knife should be as close to flat against the sharpening stone as possible. We want to retain the pointed shape of the end of the knife.
While sharpening with higher angles may result in a knife that feels super sharp at that particular moment, over time, the edge of your knife will become rounded, making it incredibly difficult to attain a good burr. When in doubt, use a smaller angle! You can always sharpen again with a slightly higher angle if needed.
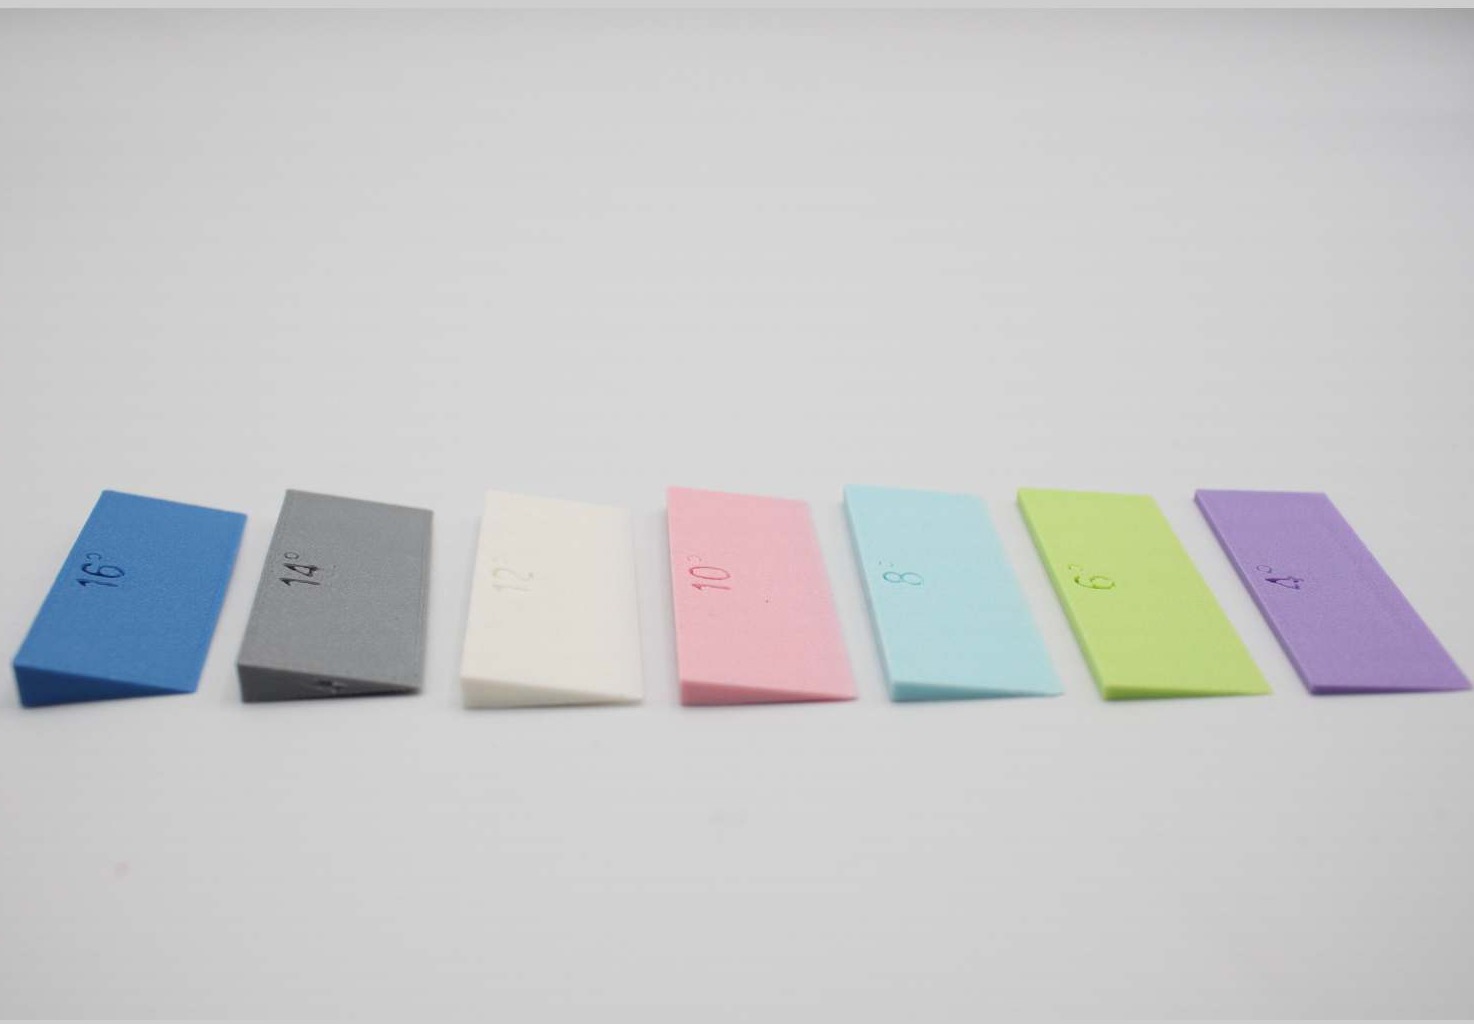
To maintain consistency, you can use our Angle Guides to ensure you use the same angle every time you sharpen. Check out our video on How to Use Angle Guides to Sharpen a Reed Knife.
Now that you know the theory behind a sharp knife, let’s learn how to sharpen!
How to Sharpen a Reed Knife
1. Prepare your sharpening stone with water or oil (according to its material), and make sure it is secured to your table or desk. To learn more about prepping sharpening stones, and whether to use water or oil, check out our article on Types of Sharpening Stones and How to Care for Them!
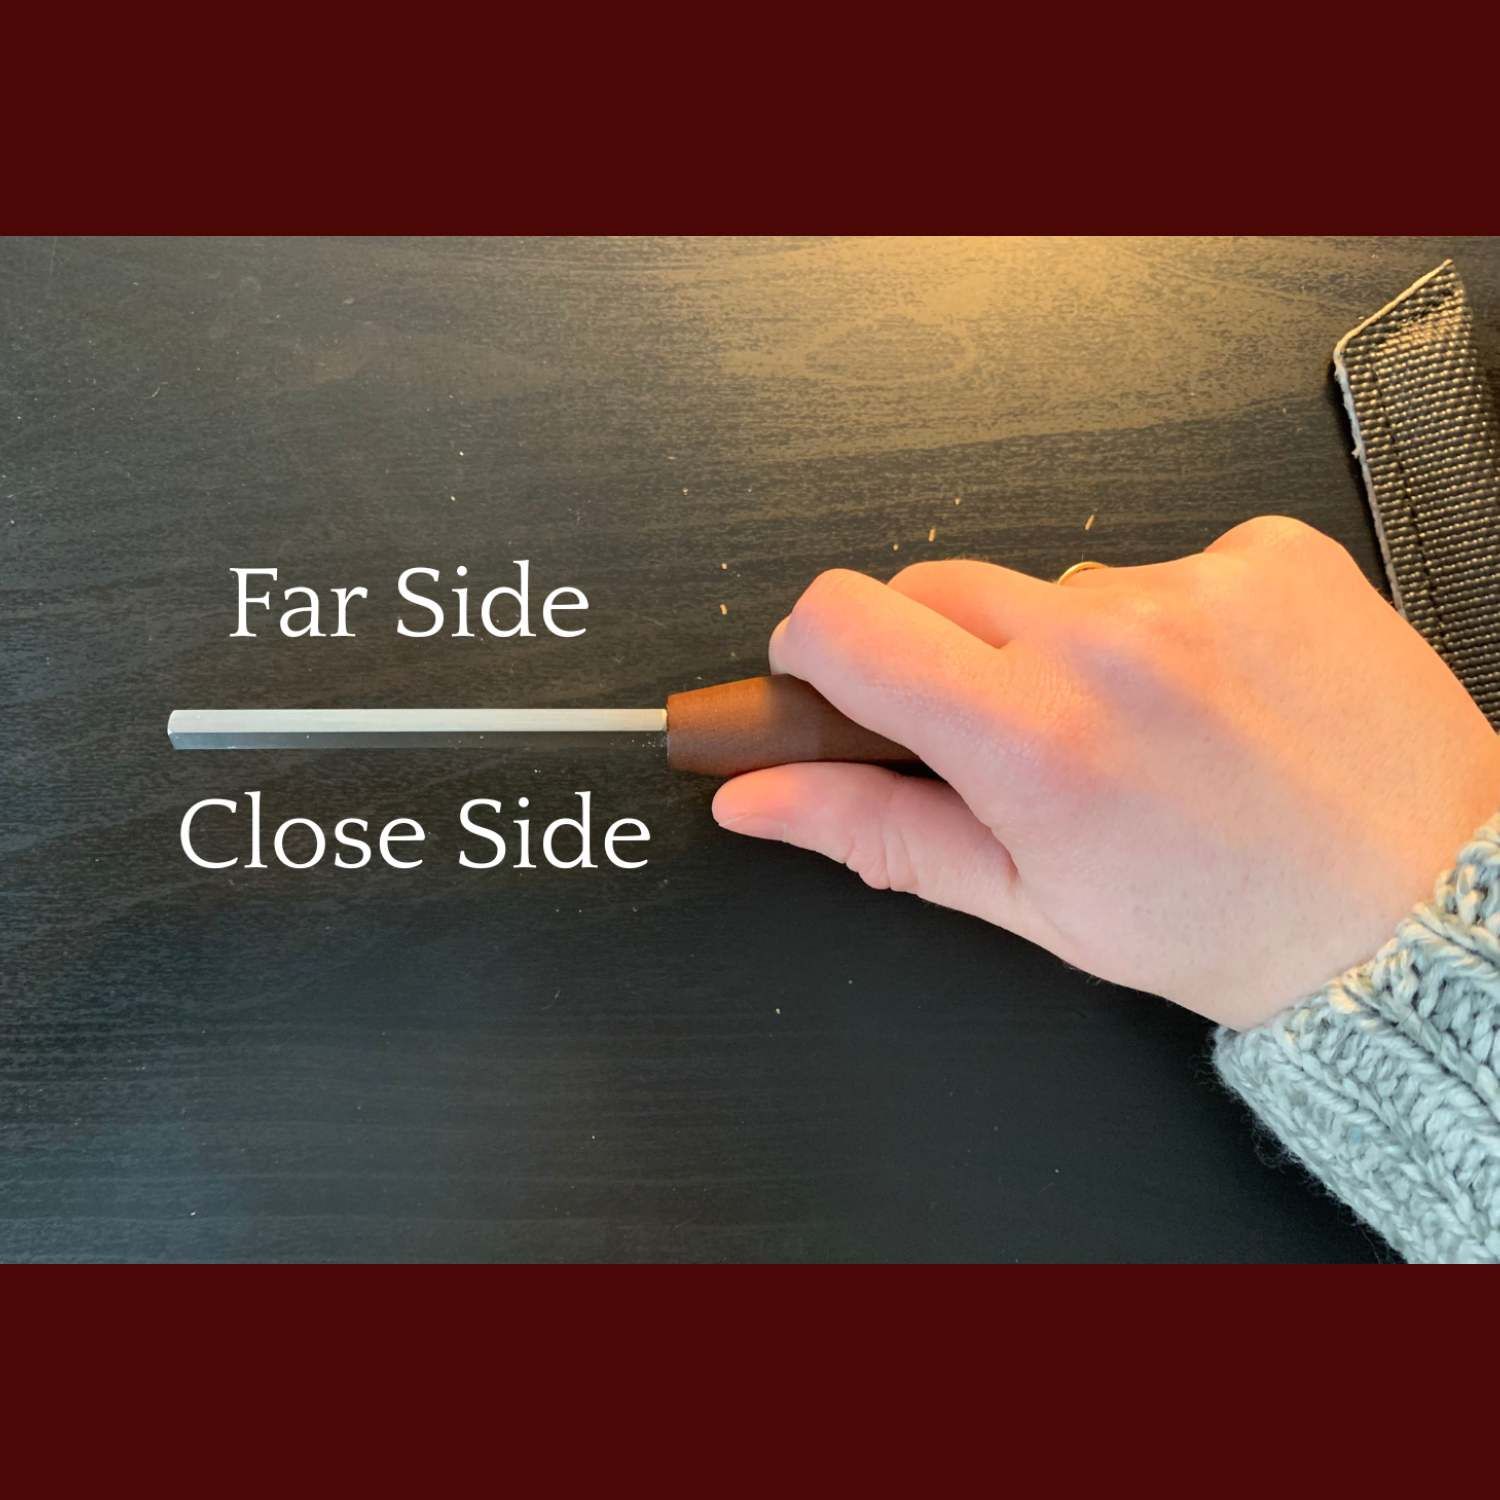
2. Determine the far side and the close side of your knife. The far side is the side that faces away from you when scraping, and the close side is towards you.
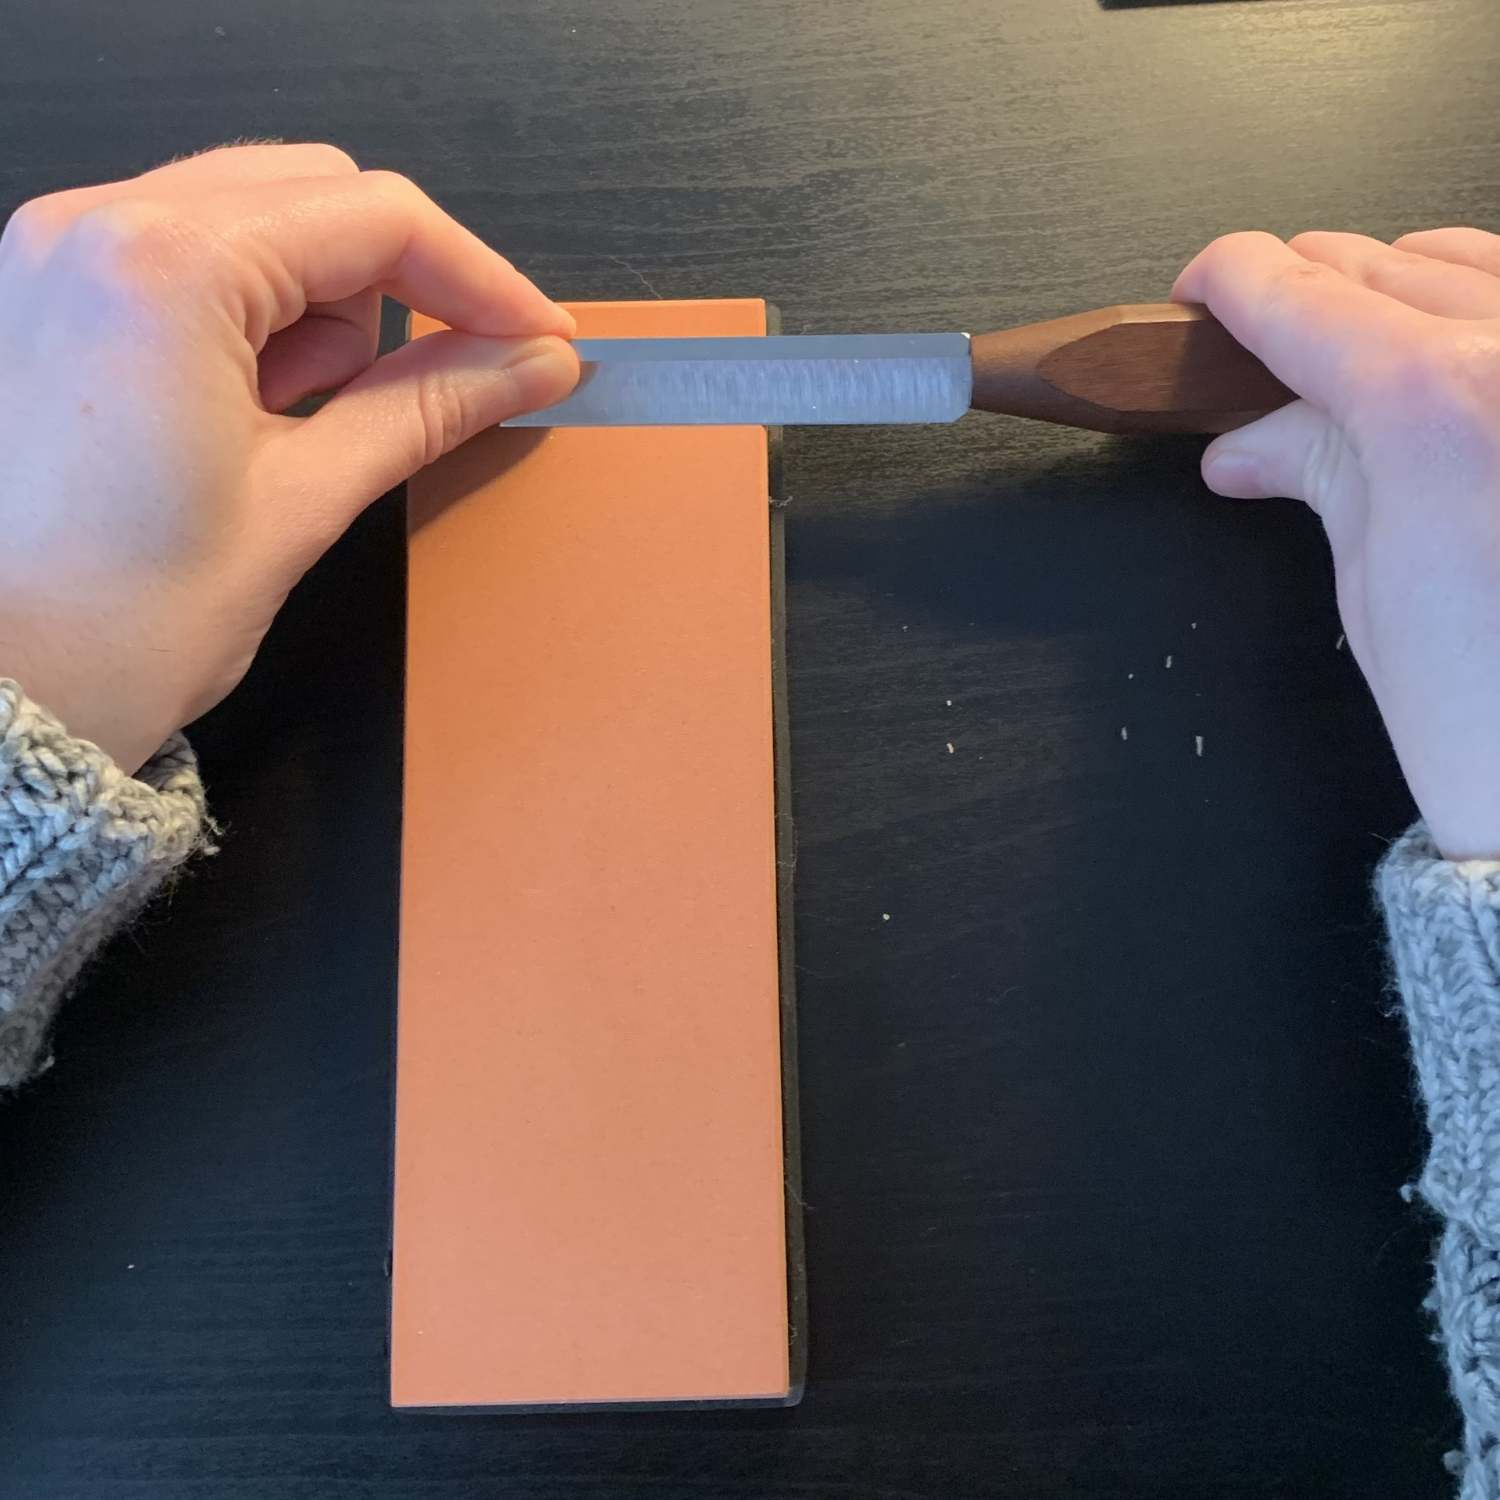
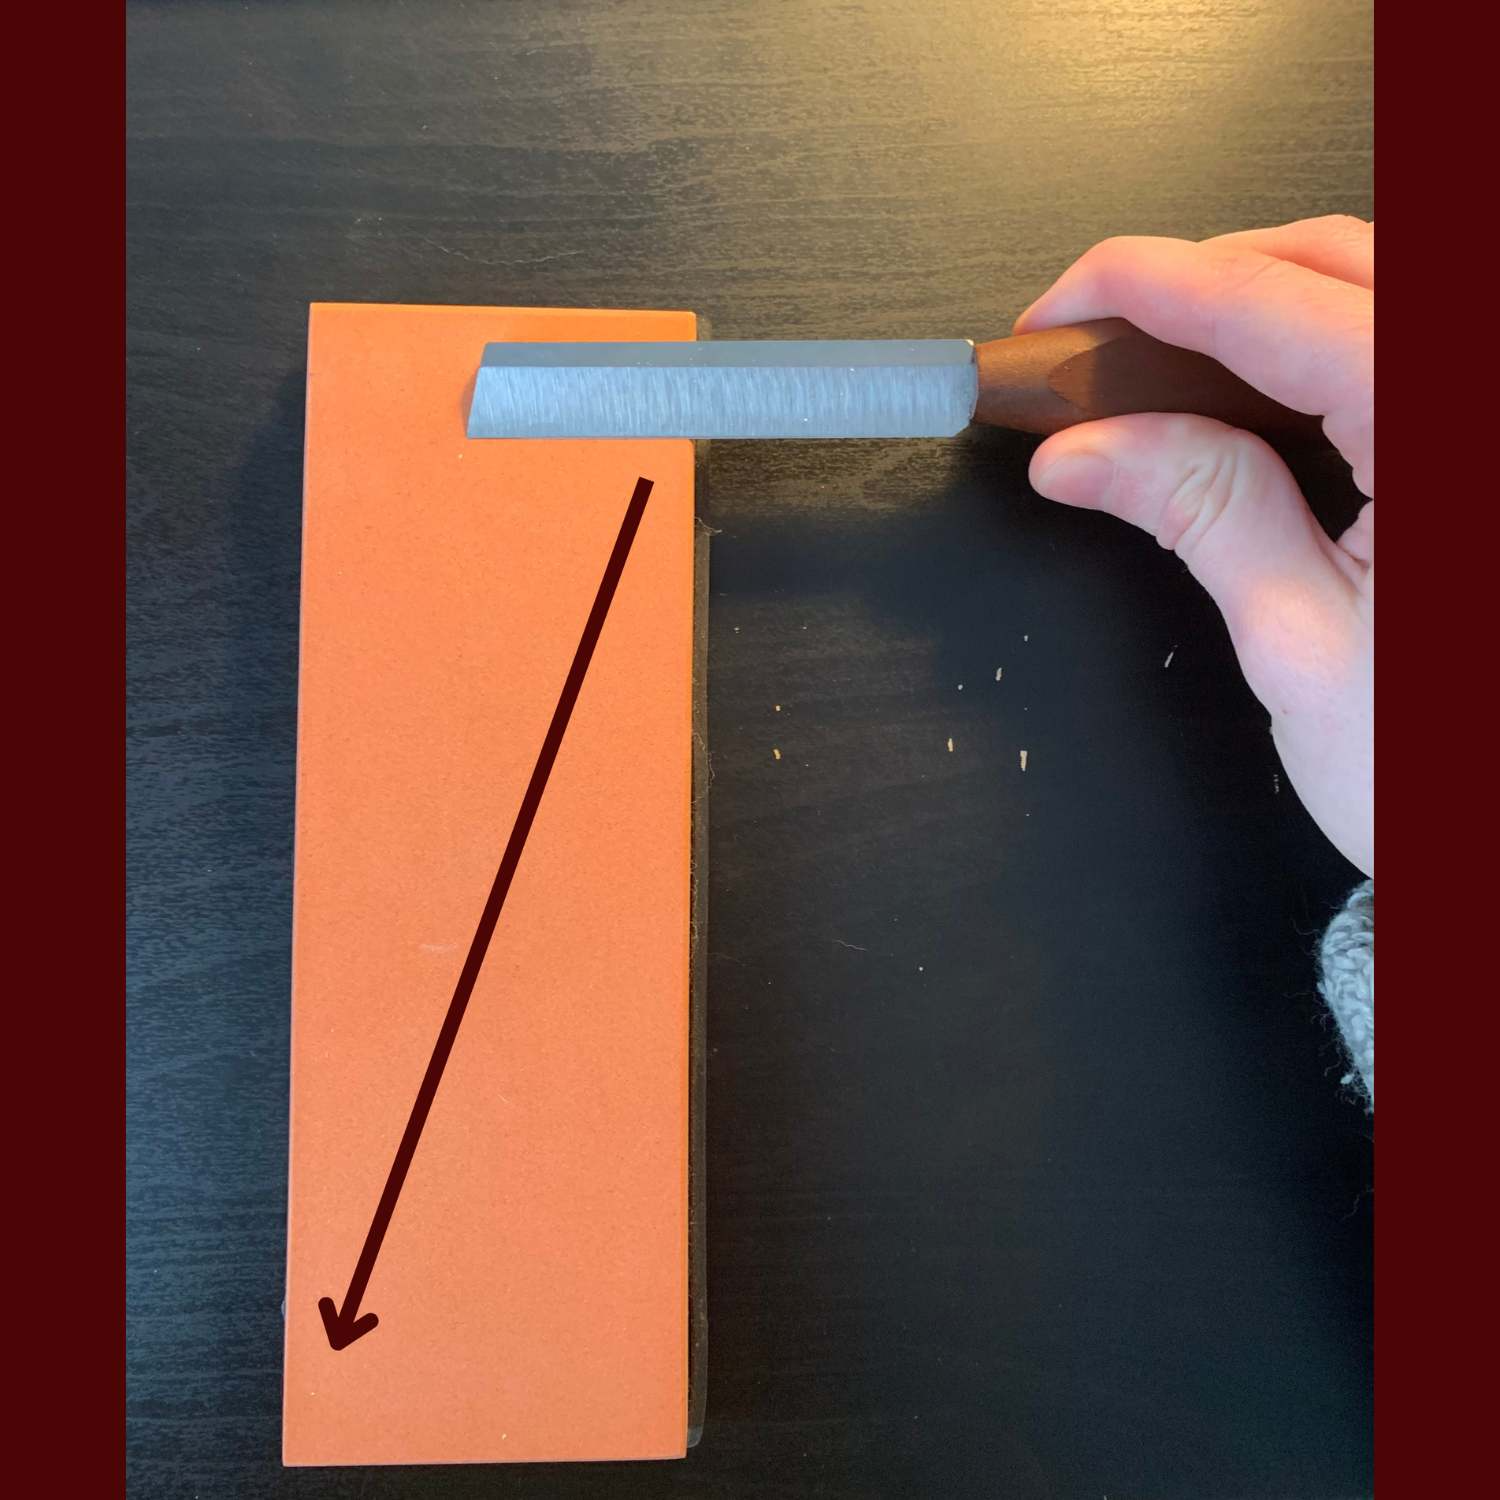
3. Place the far side of the knife flat against the top of the sharpening stone. Hold the knife handle firmly in your dominant hand, and use your thumb and index finger to guide the blade, like this:
4. Lift the top of the knife a very small amount, about 2 degrees. Imagine there is a dime underneath the top part of the knife, while the bottom edge of the knife, the cutting part, stays in contact with the sharpening stone.
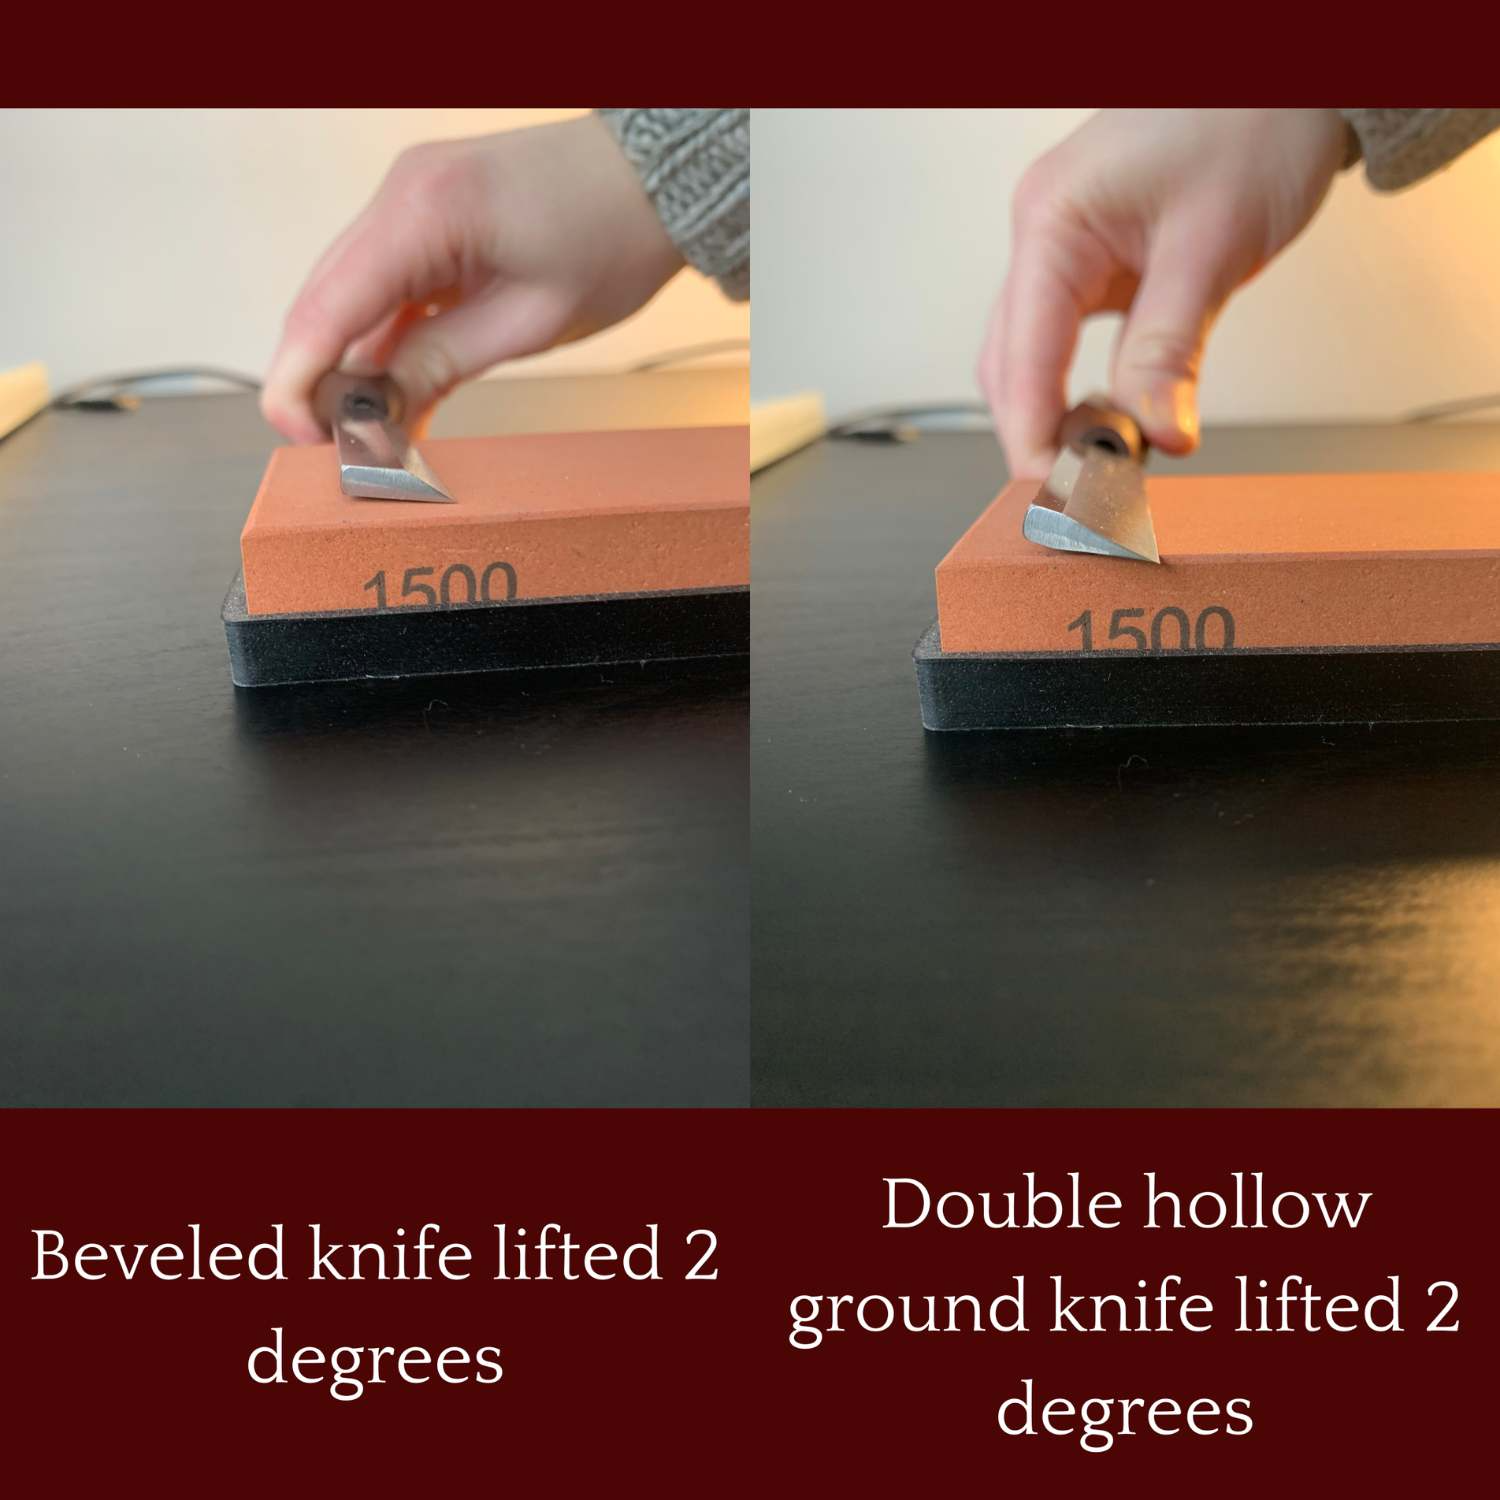
5. If your stone is wider than your knife, you will run it straight down the stone. If the knife is wider, you will need to run it down the stone at a diagonal, so that the entire length of the blade is being worked on equally. Be sure to keep the knife blade horizontal as you do this.
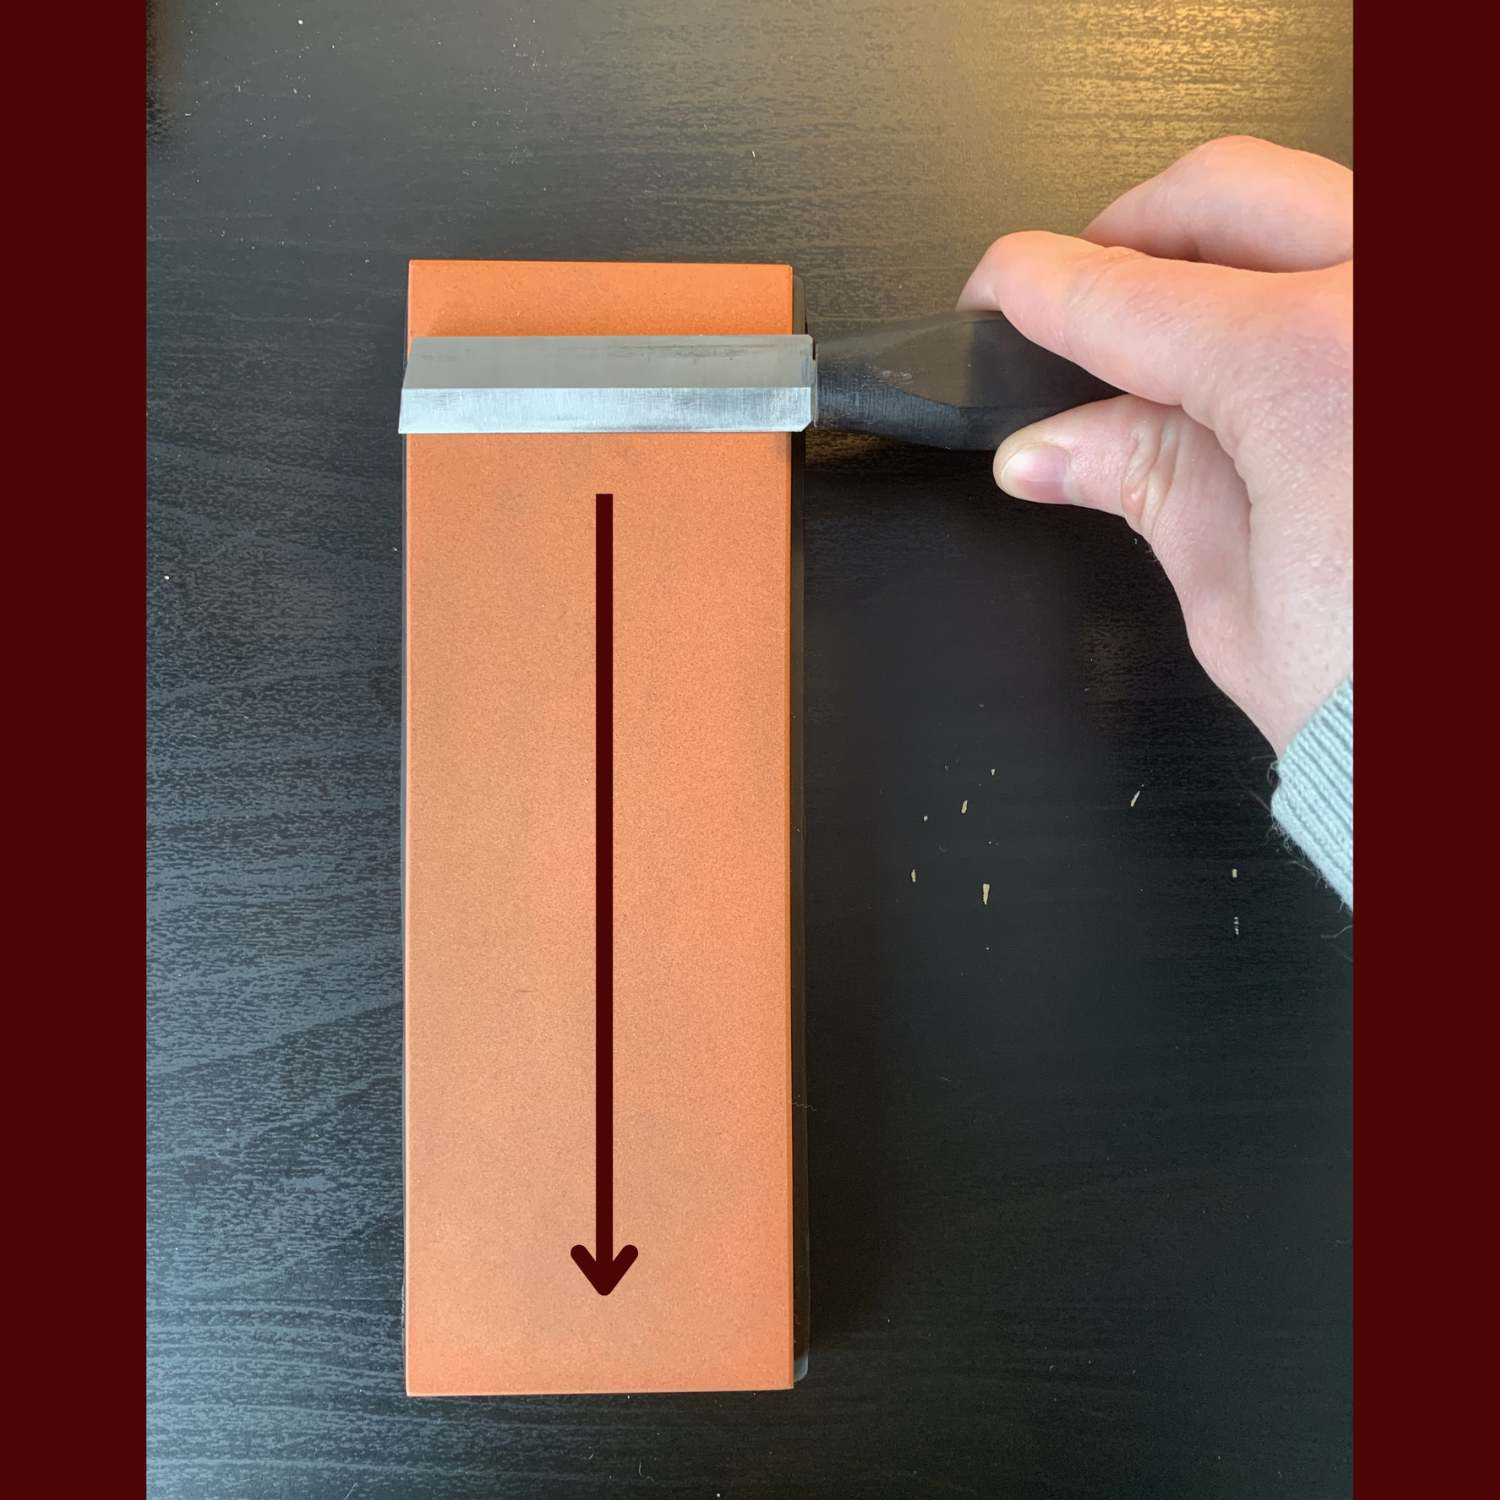
6. Using moderate downward pressure, run your knife down the stone. Listen and feel the sensation of the knife edge on the stone. If there is no sound or the sound is very soft, that means no metal is being removed. If that’s the case, increase the angle by a few degrees and try again. We’re looking for a smooth grinding sound and moderate resistance. Be sure to use the lowest angle possible (while still removing metal) to avoid rounding the edge of your knife!
7. Complete 3 to 5 swipes down the stone with the far side of your knife.
8. Turn the knife so that the close side is placed flat on the bottom of the sharpening stone. If you have a beveled knife, make sure it is the beveled portion of the knife against the stone.

9. Lift the knife slightly, again about 2 degrees, and run it up the stone. Listen and feel for the smooth grinding, and increase the angle slightly if no metal is being removed yet. Again, use the lowest possible angle to remove metal.
10. Complete 3 to 5 swipes up the stone with the close side of your knife.
11. Test the sharpness of your knife (see below).
12. If your knife is sharp, great! Make some reeds!
13. If the knife is not yet sharp enough, we need to set the burr at a higher angle. Complete one more pass up the stone on the close side of your knife. This time, angle the knife slightly higher, and press down firmly during this pass. You may hear a louder, more resonant grinding sound when setting the burr; this is normal.
14. Test the sharpness again, and repeat step 13 at a slightly higher angle if needed.
15. Congratulations, your knife is ready to make some great reeds!
Testing the Sharpness of the Knife
What Angle should the Burr be?
To check if your knife is sharp, hold it in your dominant hand with the blade upright, while gently resting the weight of the knife blade on the thumbnail of your non-dominant hand. It will look like this (for a right-handed reedmaker):
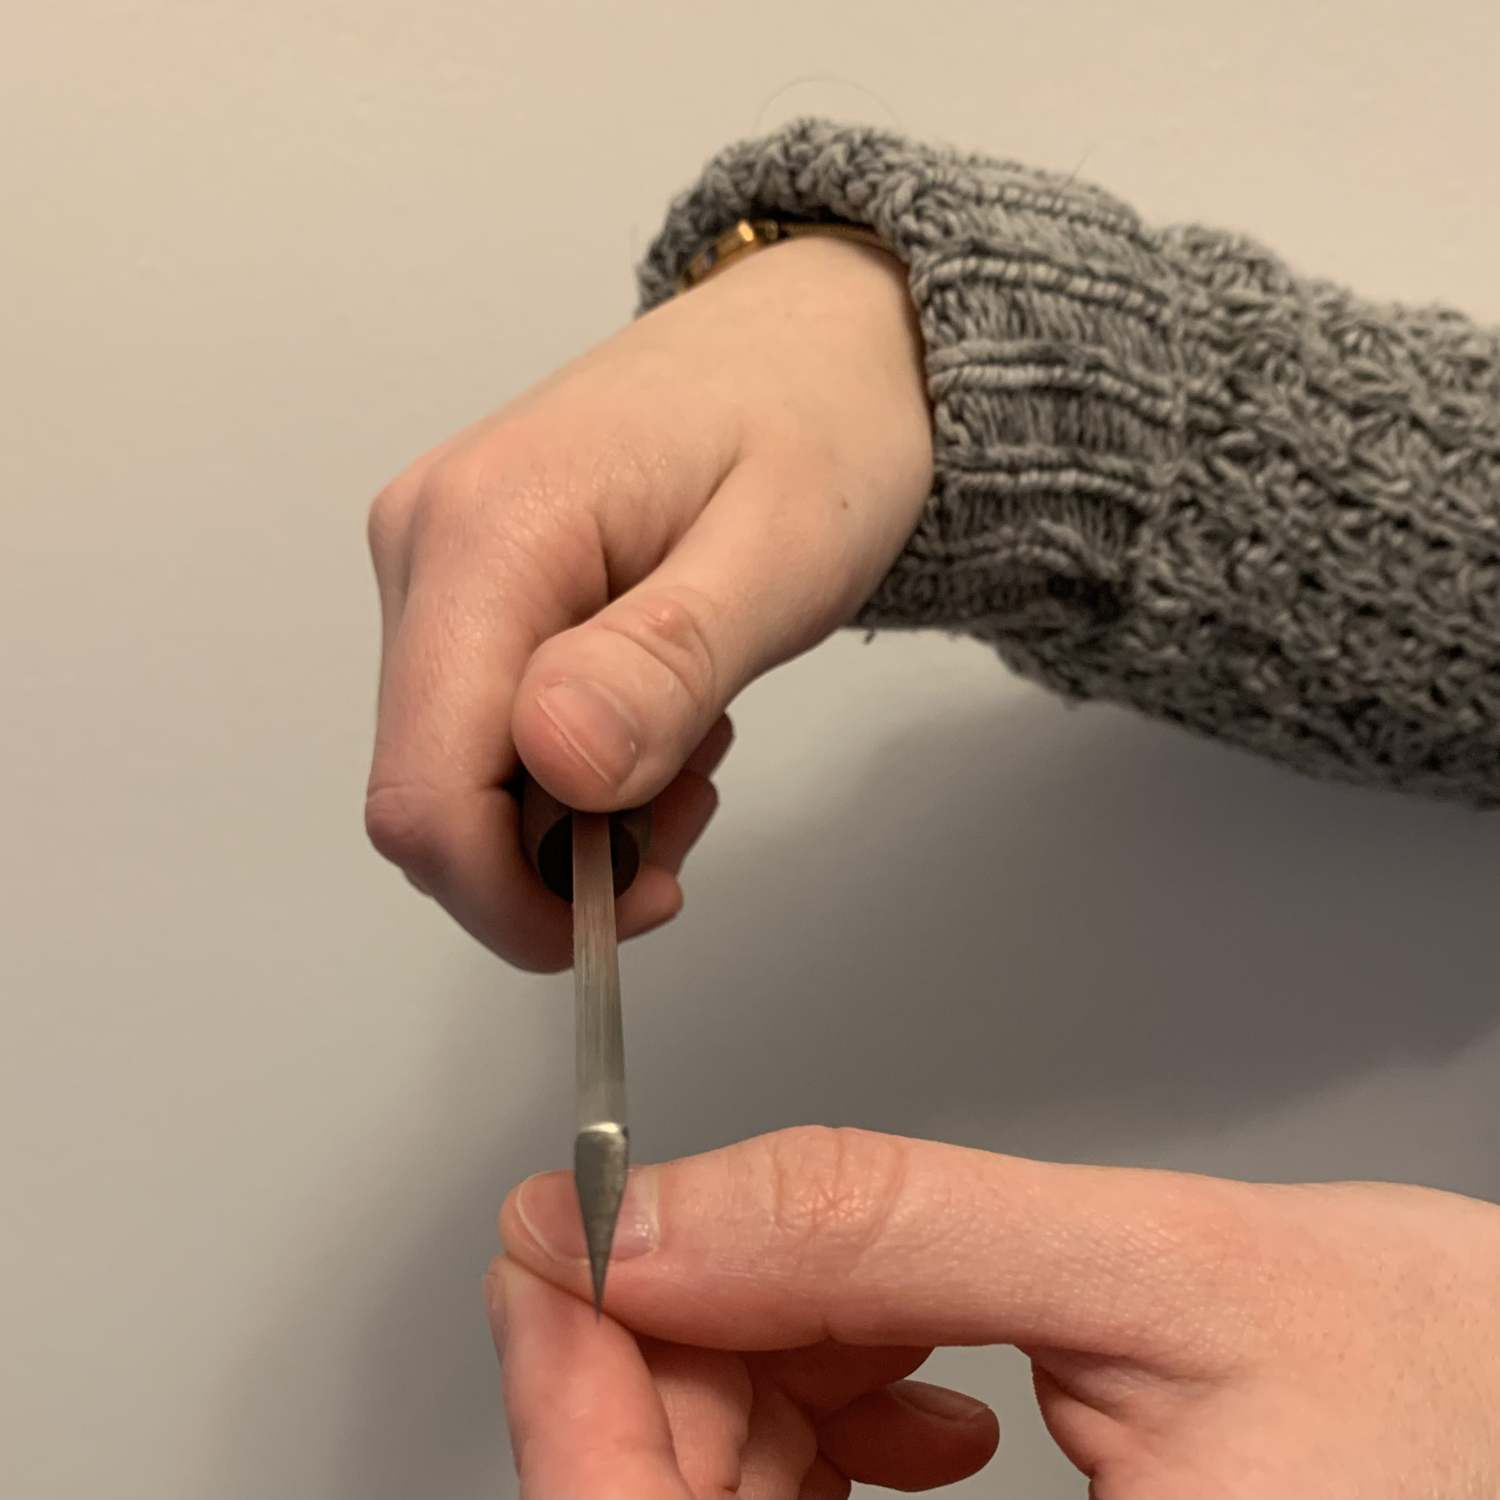
Next, gently try to move the knife forward. If the knife catches on your fingernail, it is sharp and ready to make reeds with!
If the knife can glide across your fingernail without getting stuck, that means the burr is at the wrong angle. To determine whether the angle of your burr is too steep or not steep enough, test it on your thumbnail at different angles, like this:
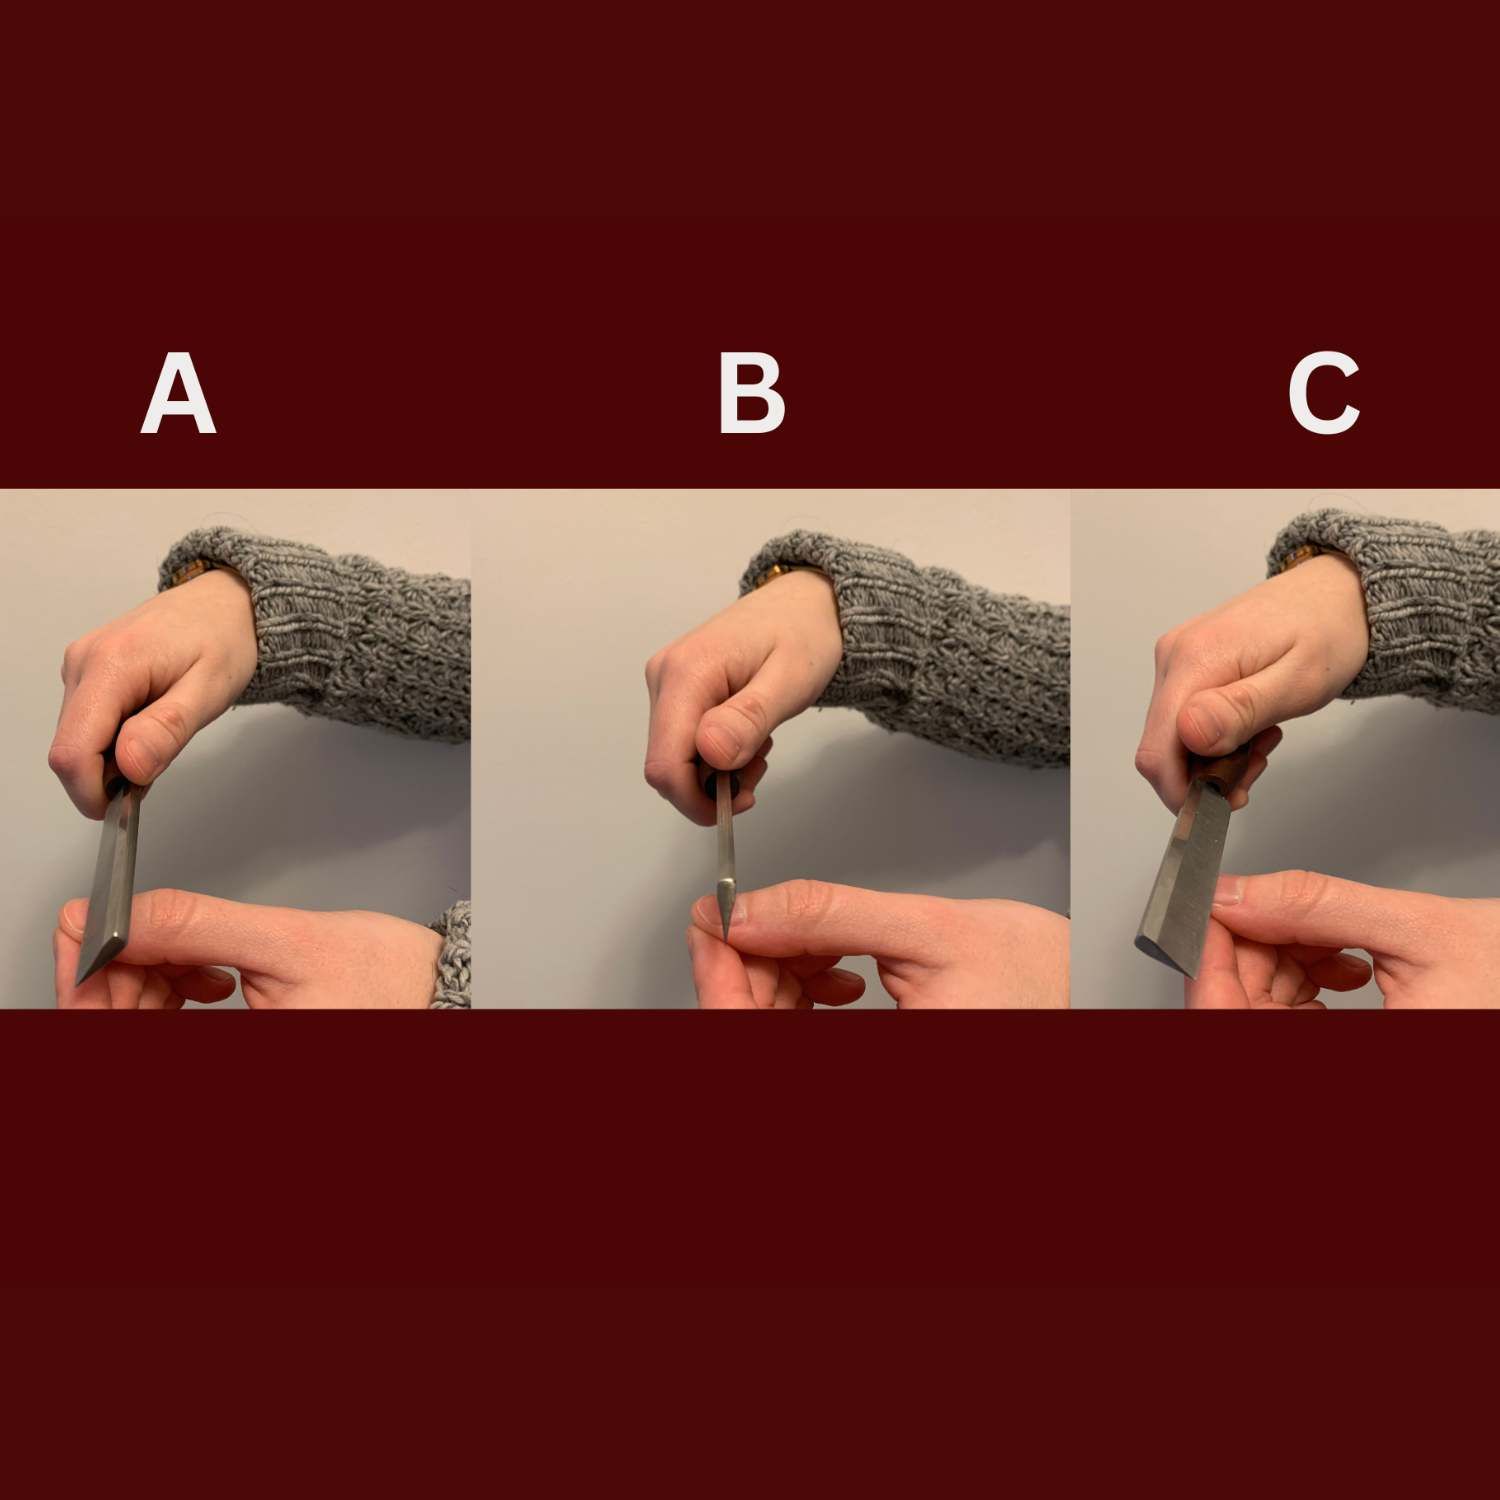
If the knife only catches on your nail while leaning back towards you (picture A), then your burr needs to be more steeply angled. That means you will need to perform another ‘burr pass’ on the sharpening stone, while lifting the knife up to a slightly higher angle. Test again on your thumbnail, and if needed, repeat at a higher angle until the burr catches while in a 90-degree position (picture B).
If the knife only catches on your nail while angled away from you (picture C), then your burr angle is too steep. If you’ve ever heard anyone talking about a reed knife being ‘too sharp’, this is what they mean. While it is technically possible to scrape a reed with a steeply angled burr, I wouldn’t recommend it, as it will create nicks/catches in the cane and will probably chip the tip.
If the burr angle is too steep, you will need to remove the burr and repeat the sharpening process from the beginning. For this reason, I recommend increasing the burr angle very slowly at the end of the sharpening process, to avoid the need to start over!
Regrinding a Dull Knife
If you’ve gone through this process and your knife still isn’t sharp (and you know that your knife is well-used and/or old), you may need to regrind the knife before following the sharpening process above. To regrind, you will need a sharpening stone with a coarser grit. For more info on sharpening stone grits, check out our article Sharpening Stone Types and How To Care for Them!
To regrind your knife:
1. Lay the far side flat against your coarser stone, and then move the knife in a circular motion, making sure to run every section of the edge of the knife over the stone.
2. Continue regrinding for 30 seconds or so on this side.
3. Turn the knife over and repeat with the close side of the knife flat against the stone.
4. Follow the regular Knife Sharpening Process above on your medium-fine to fine grit sharpening stone, to see if your knife will hold an edge now.
5. If it still isn’t sharp, repeat the regrinding process.
The intention of regrinding is to remove metal, therefore restoring the flatness of the sharpening surface angles. Once the original angles of the knife are restored, it should be able to hold a burr again.
Using Angle Guides
For added consistency and efficiency in your knife-sharpening technique, angle guides can be a great tool. I would highly recommend them for beginners learning how to sharpen their first knife. Guides could also be useful for professionals looking for a longer knife lifespan, as they can help prevent warping and rounding of the blade over time.
For a more visual explanation of this process, check out our video on How to Use Angle Guides!
To use the angle guides, first determine the smallest possible angle required to remove metal from the far side of your particular knife. A brand new knife will likely need a smaller angle than an old and worn knife, and a beveled knife will probably need a smaller angle than a double hollow ground one.
Set your knife on the smallest angle guide. Then, while holding the knife steady so it retains the same angle as the guide, run the knife down the sharpening stone to see if metal is being removed. You will know when metal is being removed when you hear and feel the knife grinding on the stone. If there is no grinding, repeat the process with the next higher angle guide.
Once you determine the angle of the far side, repeat the process for the close side of your knife, gradually increasing the angle until you hear and feel the knife grinding on the stone. Note that this may be a different angle than the far side angle, even on the same knife!
After 3 to 5 passes on the sharpening stone, test the sharpness of the knife (see above for the process). If it is sharp, you are good to go! Otherwise, you may need to set the burr at a slightly higher angle. Perform one more pass at the next highest angle, test, and repeat as needed until the burr catches your thumbnail.
Finally, note down the angles you used for that particular knife. Once you learn what angles you need for the far side, the close side, and possibly the burr setting angle (if it’s different from the close side angle), you can use those same angles every time you sharpen that knife!
A Note About Sharpening Steels
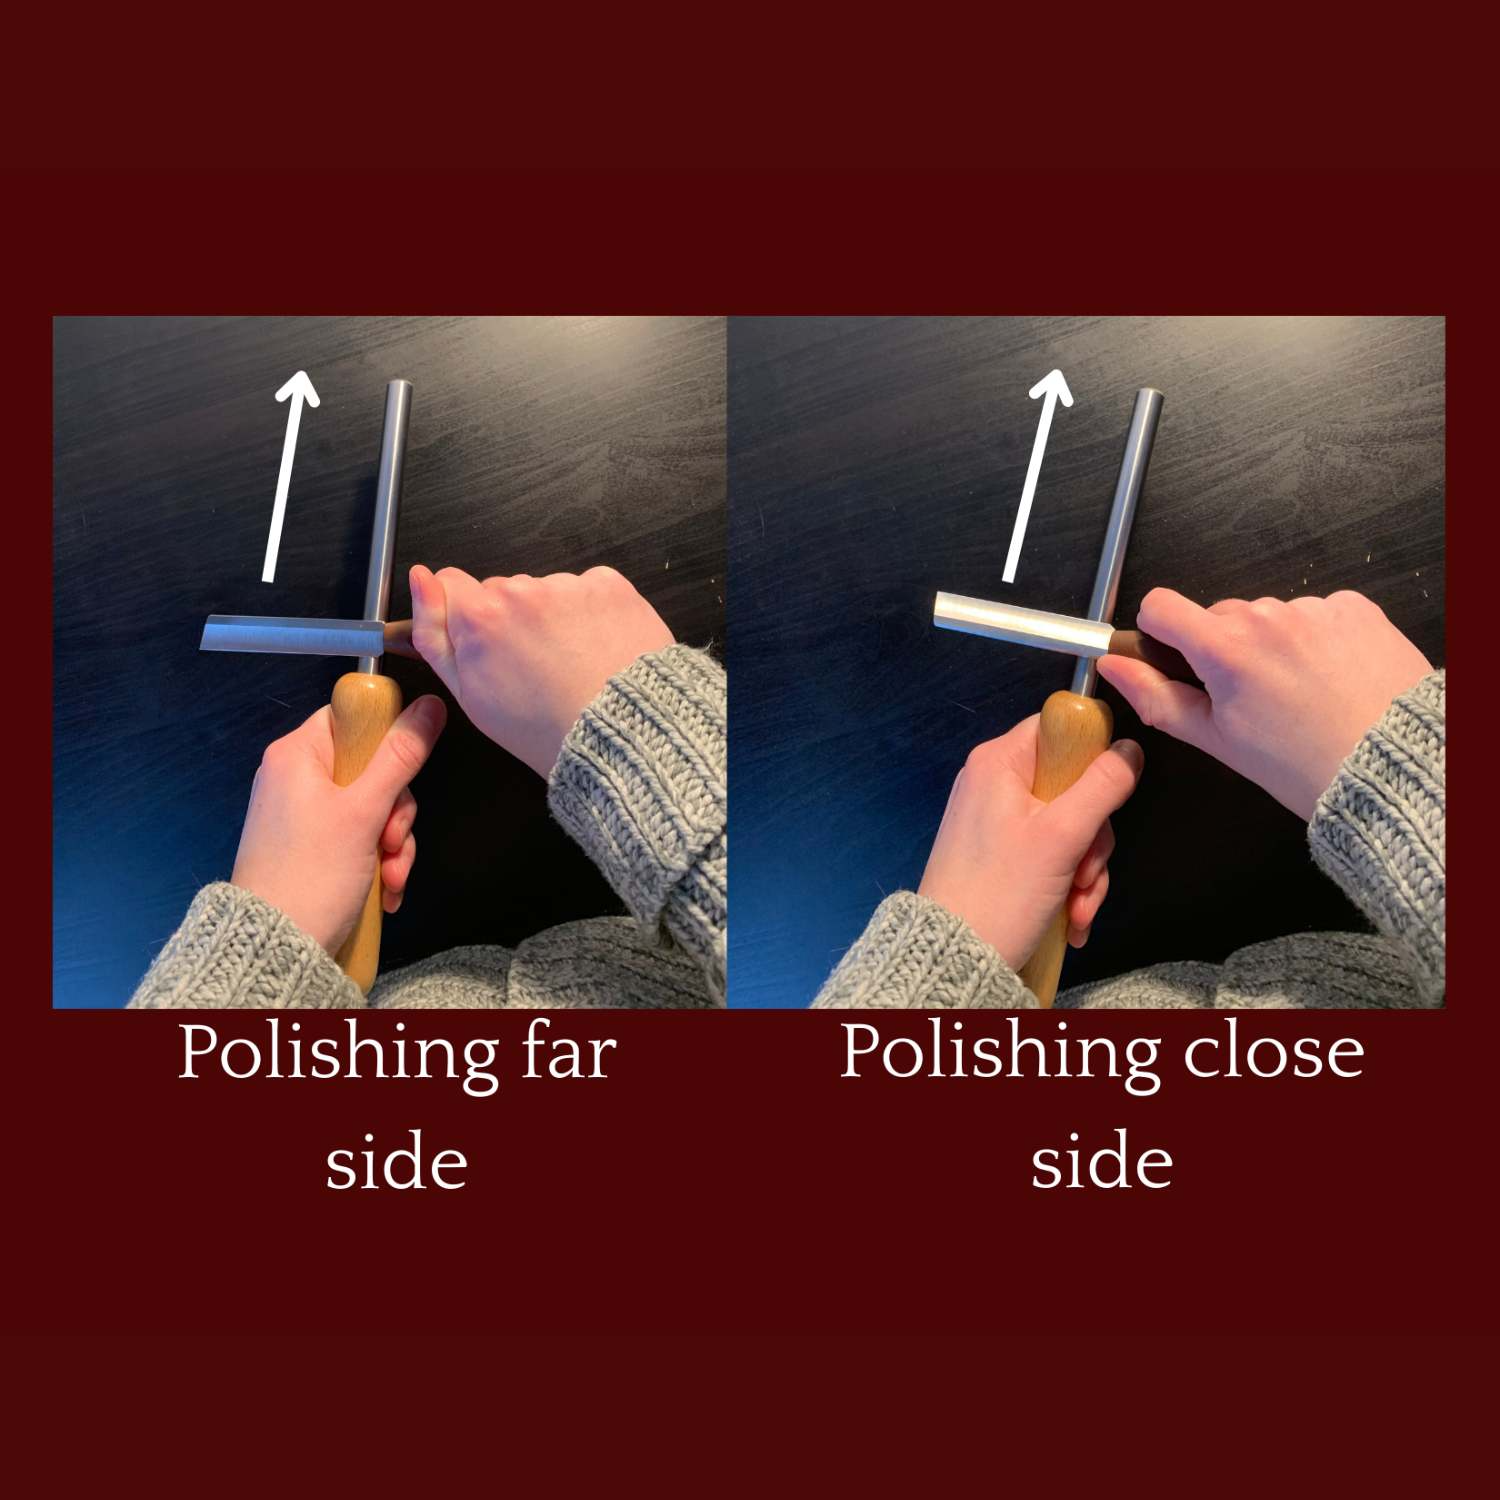
A sharpening steel, also known as a burnishing rod, can be a useful addition to any sharpening lineup. It is used as the final step in the sharpening process, and its function is to polish out any imperfections in the burr and bend it into an optimal position.
As it is being used as the final step, it’s important to note that the sharpening steel does not remove any metal from the knife. For this reason, the sharpening steel MUST be smooth steel, with no abrasion whatsoever. Many kitchen supply stores sell sharpening steels, but most of them are abrasive and therefore will not work for reed knives.
To use a sharpening steel, simply run the knife over the steel for 2-3 swipes on both sides of the knife, starting with the far side of the knife and finishing with the close side to set the burr. Keep the same angles that you used while sharpening that knife on your sharpening stone. Use moderate pressure, and be sure to always move the knife away from you, like this:
A sharpening steel can also be used to touch up the burr while reed-making, which reduces the need to fully sharpen the knife every time. This also increases the longevity of your knife, as the steel does not remove metal!
Conclusion
I hope this guide has helped you sharpen your reed knife effectively. Understanding the angles, knowing how a burr works, and using good technique are all fundamental skills for any reed maker. For more information on sharpening stone materials and maintenance, check out our article on Types of Sharpening Stones and How to Care for Them!